For years, support teams have relied on views, groups, and manual ticket assignment to manage workloads. But as customer expectations rise and support channels multiply, more organizations are turning to Zendesk Omnichannel Routing to improve efficiency, balance workloads, and create a better agent experience.
Despite the benefits, many teams hesitate to make the switch.
Why?
Because traditional Zendesk workflows provide clear visibility into ticket queues. Managers can easily see how many tickets are sitting in a view, who owns them, and where work is piling up. Omnichannel routing changes that dynamic, and many teams fear losing the visibility and control they've become accustomed to.
The good news is that most challenges associated with omnichannel routing can be addressed with proper planning.
Before enabling omnichannel routing, use this checklist to ensure your Zendesk instance is ready for success.
Why Preparation Matters
Omnichannel routing isn't simply a setting you turn on. It fundamentally changes how work is distributed across your support organization.
When configured correctly, it can:
- Reduce agent overload
- Improve response times
- Balance workloads automatically
- Increase efficiency across channels
- Improve customer satisfaction
When implemented without preparation, it can create confusion around queue visibility, agent capacity, and reporting.
The difference often comes down to planning.
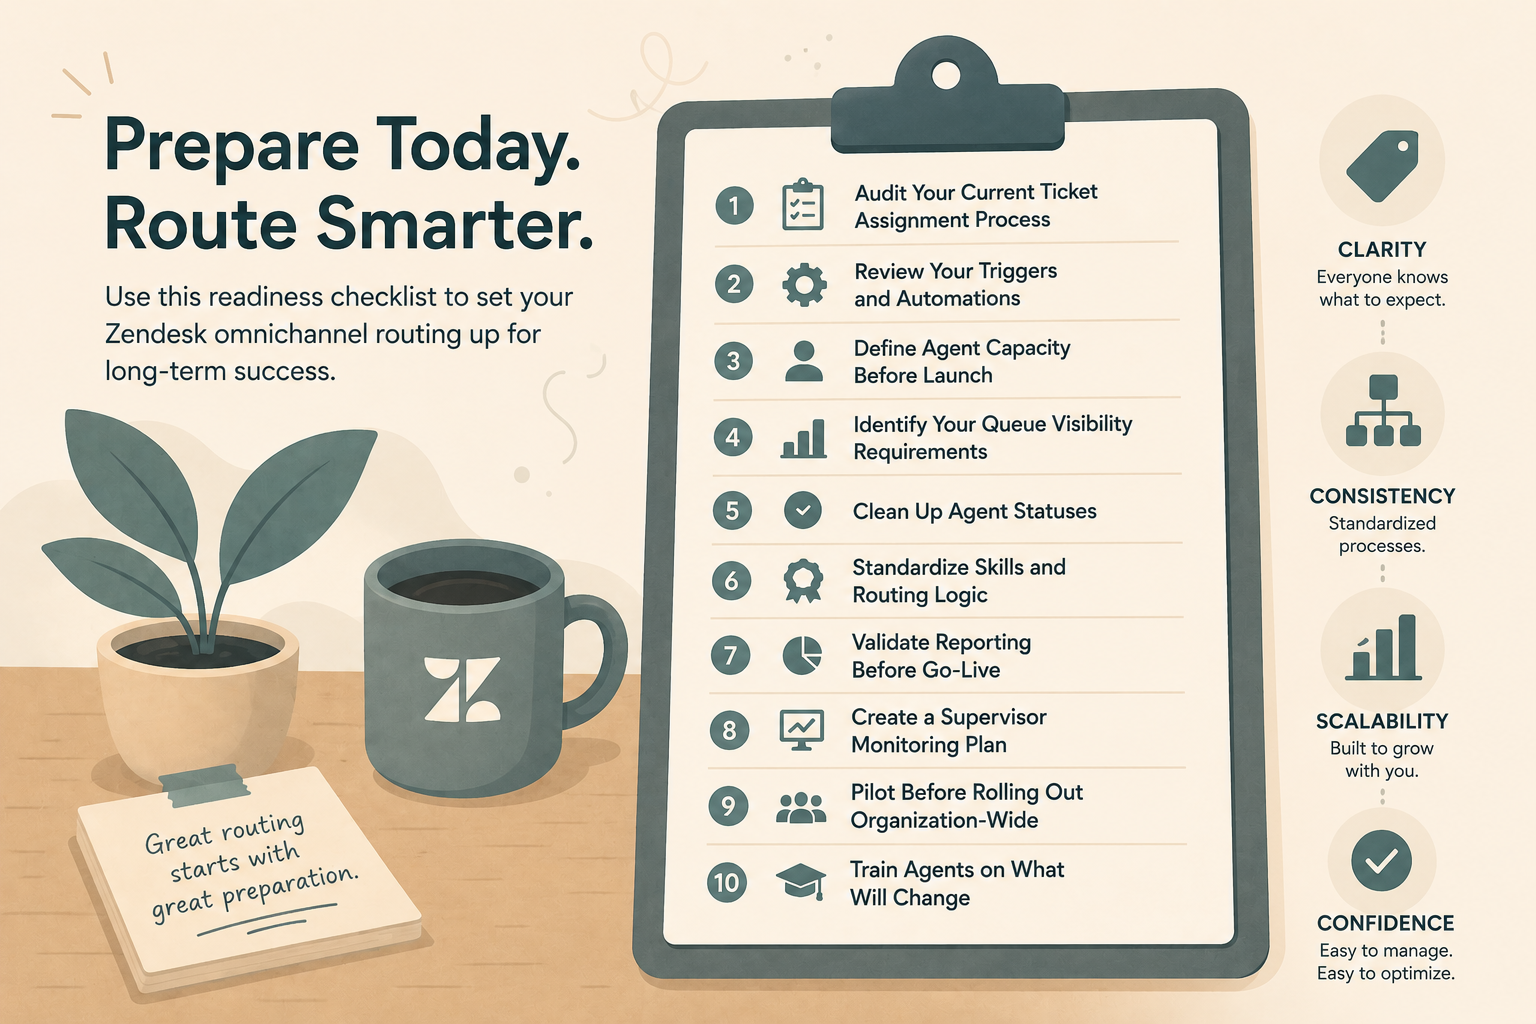
Omnichannel Routing Readiness Checklist
1. Audit Your Current Ticket Assignment Process
Start by understanding how tickets are assigned today.
Ask yourself:
- Are tickets manually assigned?
- Are triggers assigning tickets to agents or groups?
- Are managers distributing work throughout the day?
- Are there workflows that depend on specific views?
Document every assignment workflow before enabling routing.
Many organizations discover they have years of legacy automation that may conflict with omnichannel routing.
2. Review Your Existing Triggers and Automations
One of the most common implementation issues occurs when existing automations continue assigning tickets after routing is enabled.
Review:
- Assignment triggers
- Escalation triggers
- Round-robin workflows
- Custom assignment automations
- Third-party routing apps
Determine which automations should be retired, modified, or replaced by omnichannel routing functionality.
3. Define Agent Capacity Before Launch
Agent capacity is the foundation of omnichannel routing.
Without thoughtful capacity planning, teams often experience one of two problems:
- Agents become overloaded.
- Work sits unassigned because capacity limits are too restrictive.
Consider:
- Average ticket complexity
- Live channel workloads
- Escalation responsibilities
- Team experience levels
Start conservatively and adjust based on real-world performance.
Remember: capacity is not a one-time decision. It should be reviewed regularly and often.
4. Identify Your Queue Visibility Requirements
This is often the biggest concern for support leaders.
Traditional views show work waiting in queues. Omnichannel routing shifts visibility toward routing states, capacities, and agent workloads.
Before implementation, identify:
- What managers need to monitor daily
- What metrics executives expect to see
- Which reports are currently used for staffing decisions
- Which queues require operational oversight
Understanding these requirements early helps you build reporting strategies before go-live.
5. Understand Agent Statuses
Routing decisions rely heavily on agent availability.
Review and understand:
- Agent statuses
- Custom statuses
- Away statuses
- Break and lunch statuses
- Training and meeting statuses
Ask yourself:
- Do agents understand when they should be available?
- Are there unnecessary status options?
A clean status structure improves routing accuracy and forecasting.
6. Standardize Skills and Routing Logic
If you're using skills-based routing, this is the perfect time to simplify.
Many Zendesk environments accumulate dozens of overlapping skills over time causing issues and mishaps.
Review:
- Language skills
- Product skills
- Tier support skills
- Regional routing requirements
Look for opportunities to consolidate and simplify.
The more complex the routing logic, the harder it becomes to troubleshoot.
7. Validate Reporting Before Go-Live
Many teams discover reporting gaps after implementation.
Before enabling routing:
- Identify key operational reports.
- Verify required metrics exist in Explore.
- Establish baseline measurements.
- Create dashboards for supervisors.
Recommended metrics include:
- Assigned versus available capacity
- Routing backlog
- First reply time
- Resolution time
- Workload distribution
Having baseline data makes it easier to measure the impact of omnichannel routing.
8. Create a Supervisor Monitoring Plan
Supervisors often lose confidence when they can no longer rely on traditional queue views.
Build a new monitoring strategy that includes:
- Routing dashboards
- Capacity monitoring
- Agent workload reviews
- Backlog tracking
- Escalation procedures
The goal is to replace queue visibility with workload visibility.
9. Pilot Before Rolling Out Organization-Wide
Avoid implementing omnichannel routing across every team at once.
Instead:
- Utilize a sandbox if available.
- Start with a small group.
- Monitor routing behavior.
- Collect agent feedback.
- Refine reporting.
A phased rollout significantly reduces implementation risk.
10. Train Agents on What Will Change
Many routing issues stem from user confusion rather than technical configuration.
Agents should understand:
- How work is assigned
- How capacity works
- How statuses affect routing
- What to do when work appears stalled
- How to escalate routing concerns
The more transparency you provide, the smoother adoption becomes.
Common Mistakes to Avoid
As we've helped organizations implement Zendesk Omnichannel Routing, we've seen several recurring mistakes:
- Turning on routing without reviewing assignment triggers
- Overcomplicating skills-based routing
- Ignoring capacity planning
- Failing to prepare supervisors for new workflows
- Launching without updated reporting
- Rolling out to every team simultaneously
Avoiding these pitfalls can dramatically improve adoption and long-term success.
Final Thoughts
Omnichannel routing has become one of the most impactful workforce management tools available within Zendesk. But successful implementations require more than flipping a switch.
Organizations that invest time in auditing workflows, defining capacity, preparing reporting, and training their teams are far more likely to achieve the efficiency gains omnichannel routing promises.
If your team is considering the move to omnichannel routing, start with preparation. A well-planned implementation will help you maintain operational visibility while unlocking the benefits of automated work distribution.